Saturday, December 31, 2011

Packaged drinking snacks #2 出来合の酒のつまみ パート2

This is the last post of 2011. It will be the year of the dragon next year. Although this may not be a worthy ending of 2011,  this is  the second installment of the series on prepackaged drinking snacks from Japan. These three items are vacuum packed but not individually packaged. So, once you open up the bag, you have to finish them relatively quickly.

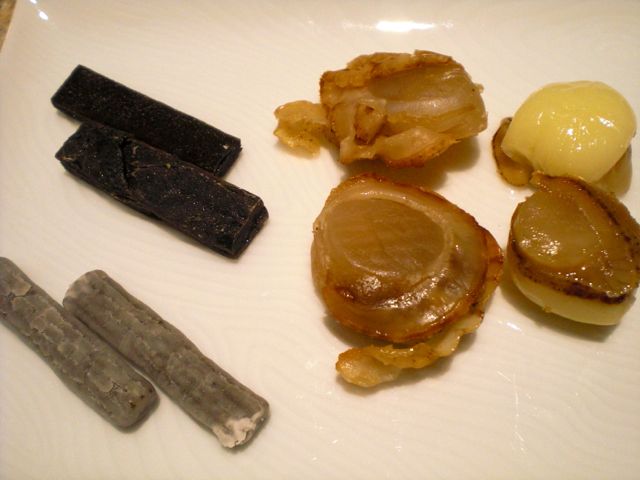
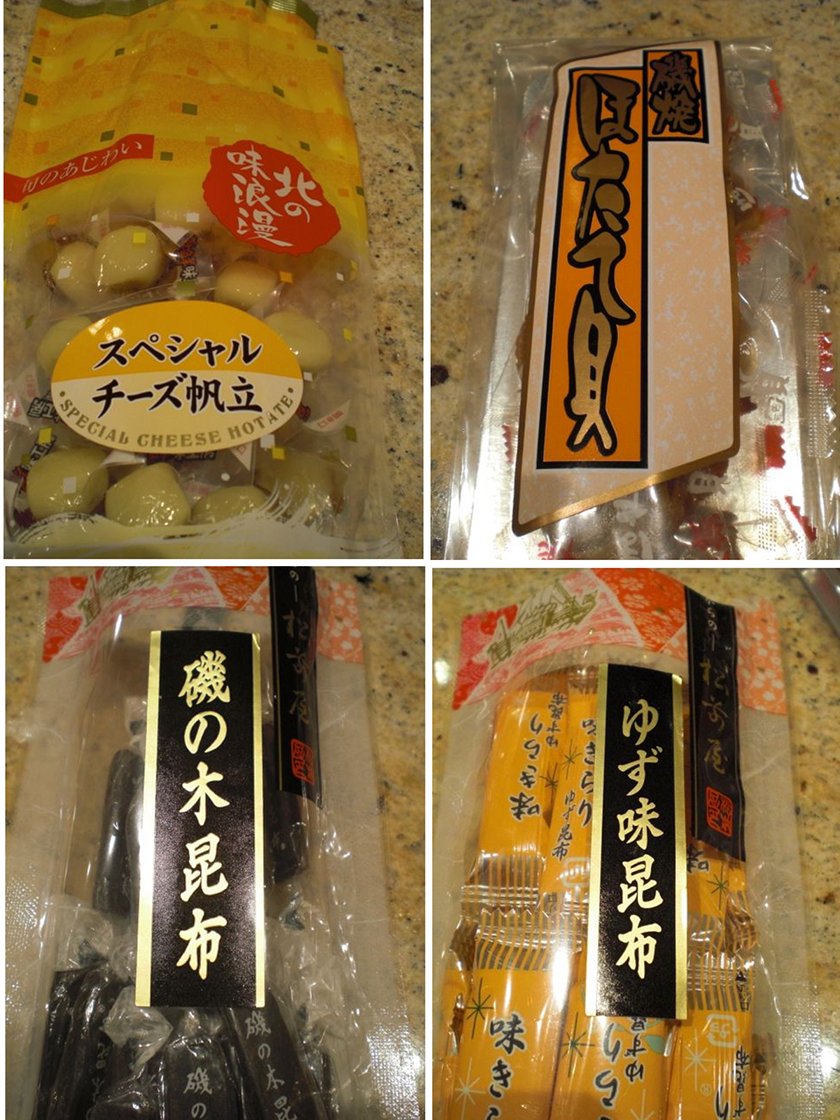
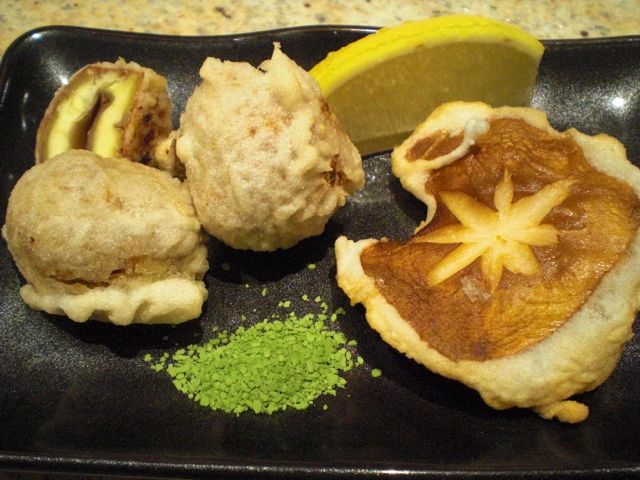
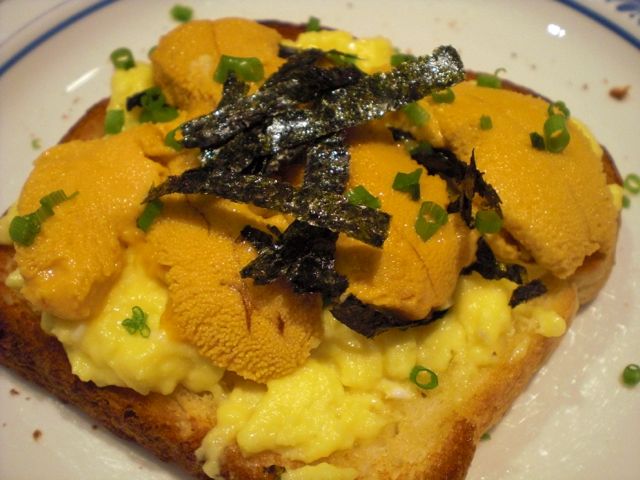
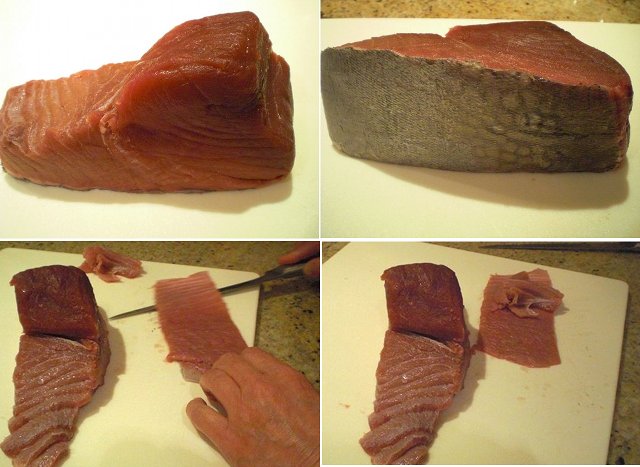
The left is miso flavored squid from Tsunami ravaged Iwate prefecture, the center is squid cheese rolls, the right is "toba" which is "cut" and "soft" accoding to the label.
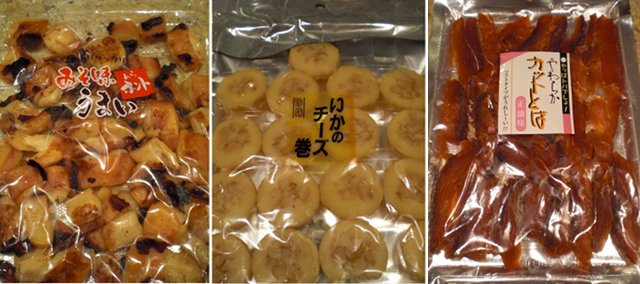
I am not sure how the squid was prepared but it is semi-dry and slightly chewy with good miso flavor. The item shown in the center picture is cut-up squid encased in mild cheese (Japanese "processed" cheese). This is rather mild and soft with a very agreeable taste. The right is "soft and cut" toba. Toba とば, written in kanji ideograms as 冬葉 which means "winter leaves". This is a famous item on my home island of Hokkaido. The name, I suppose, comes from the way the strips of salted salmon drying in the cold winter wind on the bare branches of trees resembles brown leaves. Traditonal toba is usually very chewy, or sometimes hard like a strip of leather, and very salty. It is sort of the Hokkaido version of beef jerky. This version is considerably "tamed". The skin has been removed and it is cut into smaller pieces. In addition, somehow it has been made much softer, although it is still quite salty.
(from left to right; smoked cheddar, toba, miso flavored squid, cheese-encased squid and cucmer slices)

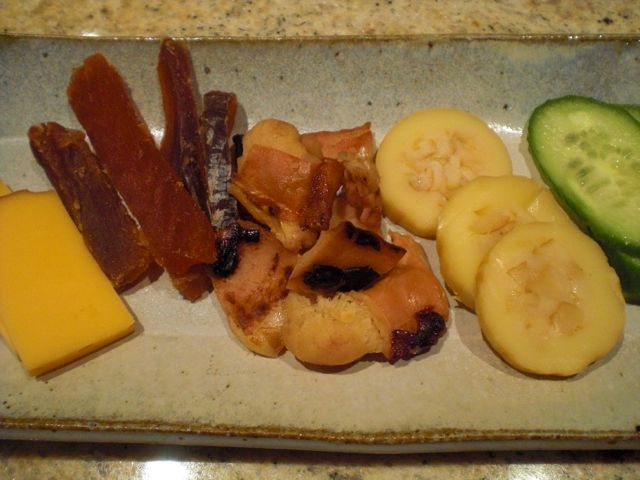
I served these three items with slices of smoked sharp cheddar cheese and slices of cucumber. Somehow, these drinking snacks called for scotch and water. Although we only rarely drink hard liquor now-a-days, I made a very small and weak scotch and water. Since we had not drunk scotch for such a long time, I had to hunt around to find a bottle and eventually came up with "Chivas Regal". Somehow toba goes well with scotch. Is it possible that I used to have toba with scotch in my drinking days in Susukino 薄野?

Thursday, December 29, 2011

Packaged drinking snacks #1 出来合の酒のつまみ パート1

Like mixed nuts, mini pretzels and goldfish crackers in American bars, the Japanese have a much wider array of prepackaged drinking snacks. So, when you are in Japan, in a pinch, even in your hotel room, you could have a small party without spending a fortune on room service. Drinks (beer, whiskey, chochu, sake or premixed alcoholic drinks in a can) and drinking snacks of many different kinds are available from vending machines or near-by convenience stores (you have a better choice in the latter). We received a care package from my mother. This year, for some reason, she sent different kinds of packaged drinking snacks. The four I am showing here came in a large bag but were individually wrapped. (Such double wrapping is very common for Japanese food items).
Here are the individually packaged items which can be stored at room temperature for quite some time. The below are what they look like after removing the wrappers.
The left upper is "Iso-noki konbu" 磯の木昆布, a small layered kelp stick, which is a bit chewy but has a slight sweetness and kelp flavor (lower left in the picture below). The lower left is another kelp snack called "Yuzu-aji konbu" or yuzu-flavored kelp ゆず味昆布, a similar small kelp stick but less chewy with a nice yuzu citrus flavor (lower right in the picture below). In the center is "Iso-yaki hotate-gai" shore-grilled scallop 磯焼き帆立貝, which is a semi dried and cooked (the name implies grilled-on-the-shore) scallops. They have a nice scallop flavor but do not appear to be smoked but seasoned instead - soy sauce, mirin?? (Upper right in the picture below). Finally, on the right in the above picture is "Specail cheese hotate" スペシャル チーズ帆立, the muscle of scollop with mild cheese covering one side (Left upper in the picture below). This one is not as strongly flavored as the shore-grilled scallop.
These snacks are much more interesting and tasty (and sometimes chewy) than their American counterparts. It is very convenient as a drinking snack while you are making something else for your drink. My wife liked the yu-zu flavored kelp stick the best followed by the cheese covered scallop. I was more partial to the two scallop snacks. Whichever snacks we preferred, we both ended up drinking quantities of water--because although individually they are pleasingly seasoned cumulatively we felt we had eaten a lot of salt.

Tuesday, December 27, 2011

Omelet rice オムライス

One evening, this was what we had as a shime 〆 or ending dish. I thought about what we had in the fridge and suggested to my wife "chicken omelet rice" or "omuraisu" オムライス. Omuraisu, "omu" is short for "omelet" and "raisu" i.e. rice in Japanese. It is a quintessential Japanese style Western "Yoshoku" 洋食 dish and also one "kids" like. I am not sure about the history of omuraisu but the movie "Tampopo" たんぽぽ made a version of omuraisu famous. Please see this link for the details and the actual movie footage.

The basic omurice is fried rice flavored with ketchup and covered with an omelet. I do remember my mother making it for us when we were kids. She had a special rice mold just for omurice.
You cannot really appreciate the size of this omurice seen above but this is a miniature version and probably less than 1/3 of the usual size. As such it is a perfect shime or ending dish for us.

Rice: As ususal I used previously frozen rice (about 1/2 cup) which was briefly microwaved; not warm but the grains could be separated (in my case about 30-40 seconds).

I used finely chopped shallot (1 medium or onion), leftover barbecued chicken (meat from one leg, cut into small cubes), and parsley (several sprigs, finely chopped). The more authentic recipe calls for canned green peas for greenery.

I added light olive oil (1 tbs) to a non-stick frying pan on medium heat. I first sautéed the shallot for 1 minute or until it became semi transparent, I then added the chicken meat and the rice and fried them for 1-2 minutes. I seasoned it with salt and pepper. I then moved the rice mixture to one side making an empty area in the frying pan. I added about 2 tbs of ketchup and stirred using a silicon spatula without mixing it with the rice for 1 minutes until the color darkened (which makes the flavor of ketchup a bit more complex).  I then mixed the ketchup with the rice mixture and added the parsley. I tasted (adjust the seasonings if needed) but did not need more seasonings.

After I divided the fried rice into two portions, I cleaned the frying pan and added a pat of butter and one egg (beaten) to make a thin omelet. I devided the omelet in half and draped it over the mound of rice and adjusted the shape to make it presentable. I squirted the ketchup on the top and added parsely springs as a garnish. If you have, you could erect a small Japanese flag or any national flag of your choice on the omuraisu but that is for kids. I have no idea  why a flag is used to decorate a "lunch" for kids or "Okosama ranchi" お子様ランチ in which "omuraisu" is one of the most popular items.

My wife is not crazy about "ketchup" flavored rice but I think this is a perfectly fine dish for adults to end the evening as long as you do not erect a national flag on it.

Sunday, December 25, 2011

Edible chrysanthemum with black sesame sauce 春菊の黒ごま和え

Edible chrysanthemum or "shungiku" 春菊 is one of my wife's favorite Japanese vegetables. We even grew some from the seeds for few years.  The harvest, however was was quite meager and the plants frequently got leggy consisting mostly of stalks with few leaves so we stopped growing it. Only sporadically, do I see fresh shungiku at the Japanese grocery store. This green is usually used in "Sukiyaki". My wife, however, gets quite creative with it, claiming that "shungiku in not just for sukiyaki any more." She shocked several of my Japanese friends by using it as lettuce in a salad..."but it is never eaten this way in Japan", they exclaimed. My wife asked, "why not?"

I bought shungiku last weekend but did not have a chance to prepare it. Rather than let them go waste, I decided to make this simple dish.
Shungiku: This started out as a good sized bunch but once cooked, like spinach, it reduced tremendously. I first cut off the largest stalks on the bottom and blanched the bunch in salted boiling water for about 1 minute and immediately shocked it in ice water. Using paper towels, I wrapped the shungiku and squeezed out any excess moisture as much as I could. I then wrapped the shungiku in nori sheet to make a cylindar. I sliced the cylindar into 4 pieces (2 pieces per serving as you can see above).

Black sesame sauce: This is exactly as I posted before. I used black sesame paste from the pouch (2 tbs), sugar (1 tsp), soy sauce (1-2 tbs), if needed, sake or mirin to adjust the consistency.

The flavor of shungiku is very unique. It is not spinach and really taste like "chrysanthemum". This is rather healthy but quick good dish. Next time, when I get fresh shungiku, I have to make sukiyaki--unless my wife comes up with something else first.

Friday, December 23, 2011

Drunken tomatoes and its "marinade" Martini 酔っ払いトマトとマーティニ

This is certainly not post-worthy but I noted it anyway just in case I have a lean time for recipes (such as now). I have previously mentioned our favorite way of preserving and enjoying Campari or cherry tomatoes; we make them into a drunken tomato or Martini-on-a-stick.
I first blanch the tomatoes (Campari or cherry or even grape tomatoes), shock them in ice water to stop the cooking and then remove the skin. For marinade, I use either straight Vodka or more often,  Vodka or Gin Martini (I prefer Gin and used Tanqueray this time, the proportion of dry vermouth is up to your taste) and soak these skinned tomatoes. After overnight soaking in a refrigerator, they are ready to be enjoyed. The most proper way is to put tooth picks and serve several on a plate with a small mound of salt on the side and call it "Martini or Bloody Mary-on-the-stick". Another way is to use it as a garnish or as a salad. 

Soaking tomatoes in alcohol keep them fresh tasting for long time in the refrigerator but after one week, it is time to finish up. So I made a salad from the drunken tomatoes, leftover baked cauliflower, chick peas and olive and baby arugula.  For dressing, I simply splashed Champagne  vinegar, good fruity olive oil, a few grinds of black pepper, and sprinkling of salt.

And now, the piece de resistance is the marinade. It is essentially gin martini but has nice sweet tomato flavors and is much easier to drink than straight gin martini. It serves as a perfect aperitif, and with the salad, a promising start of the evening.

Wednesday, December 21, 2011

Chestnut croquettes 栗のコロッケ

This looks like "Menchi-katsu" メンチカツ but this is made completely with chestnuts, no meat or anything else is involved. After I got the second batch of North American chestnuts, I looked for chestnut recipes and found this chestnut croquettes recipe.
Here, are the cut surfaces. 
I only made three but to make three I needed 5 chestnuts for the batter (#1). I broke up boiled and cleaned chestnuts (5) and put them into a small bowl food processor. I added milk gradually white running the processor until a nice consistency of the batter was reached (#2). Actually, I overdid the milk so I added a small amount of potato starch to adjust the consistency. I then encased the three chestnuts with the batter (#3) and then rolled them in Japanese Panko crumbs (#4). I skipped the usual steps of dredging in flour and egg water steps since I did not feel they were needed. I let them sit for few minutes so that the panko adhered better to the nuts (#5) and deep dried them in 340F peanut oil on medium flame (#6) for several minutes.
This is really good. Chestnut encased in chestnut batter is a great combination. We really enjoyed the sweetness of chestnuts and the levels of texture ranging from the interior nut, through the batter surrounding it, topped with the crunch of the outer layer. I liked the chestnut tempura and this croquette equally well but my wife said she definitely like the croquette better. She said the croquette really had substance and could be served as the "meat" part of a meal. She also said she now realizes chestnuts are indeed "real" food you can enjoy.

Monday, December 19, 2011

Chestnut tempura 栗の天ぷら

We got North American chestnuts from Girolami farm this year and were very much impressed with how good they were and I ordered another 3 lbs. One of the difficulties in dealing with chestnuts especially the North American variety is removing the inner brown skin or "shibukawa" 渋皮. It appears that the shibukawa does not just cover the surface of the chestnuts but goes deep into the cleavage of the nuts making it extremely difficult to remove, and making the nuts taste bitter if it is not removed. I do not remember this characteristic in Japanese chestnuts. In any case, I solved this problem after few tries (see below).
After I found the way to remove the shibukawa fairly easily and completely, I saw the description of chestnut tempura. Although I have never had or made this, I decided to try it. The above is the result. It is excellent and the chestnut's sweetness and nice texture came through very well.
I also made shiitake mushroom tempura and served them with my usual green tea salt as seen above.
Now my method of removing the shibukawa inner skin: I first soaked the chestnuts in cold water for a few hours. I put the pot with chestnut in it on high flame until it started boiling, I turned it down to simmer. I cooked for 15-20 minutes and shut off the flame. I let it sit in the pot for 20 or so minutes. I scooped up several chestnuts at a time using a large slotted spoon and started removing the outer and inner skins. It was still rather hot but just cool enough that I could handle them. When I pulled on the shibukawa using a paring knife, to my surprise it came off very easily and with a little care, the shibukawa even came out from the cleavages as seen above. When the chestnuts got cold or dry and were too long out of the cooking water, it became more difficult to remove the shibukawa and the nuts tended to break when I tried. So, I worked 4-5 chestnuts at a time. In any case, I got really good at it and removed both outer and inner skins breaking only few chestnuts. I produced a good numbers of intact chestnuts with both skins completely removed this way.

The tempura batter is my usual; a mixture of potato starch and cake flour mixed with cold water. I  made a somehwat thick batter for this. I deep fried it in fresh peanut oil at 340F for 3-4 minutes.

This is surprisingly good.  The natural sweetness of chestnuts is really enhanced and nice combined with nice "hokuhoku*" ホクホク texture. 

*It is difficult to translate to English. This is to express the texture of starchy root vegetables such as boiled or grilled potato especially roasted sweet potato called "Ishi-yaki Imo".

Saturday, December 17, 2011

Potato with nori "Tsukudani" and butter  小芋のバターと海苔の佃煮添え

In Japan, raw nori 生海苔 can be had as a seasonal item (I think it is in winter and early spring). I only remember that we had this a few times--it is not a very common item even in Japan. One of the famous dishes made from raw nori is "Tsukuda-ni"  海苔の佃煮. I do remember one commercial product called "Edo-murasaki" 江戸むらさき which came in a glass jar. It is very salty and had an almost chemical taste to me and I did not like it then. It has been a very popular condiment (for breakfast) and goes well with a white rice.

When I made a nori wrapped cod roe omelet, I had excess nori sheets and made this instant "Nori Tsukudani". I read this recipe a long time ago in one of the drinking snack cook books and made it once or twice in the past but until now, I completely forgot about this dish.
Here is what it looks like (below left) and it is very simple to make. I just tore a dried nori sheet into small pieces (by hand) and place the pieces in a frying pan. I then added enough sake that the nori just absorbed the moisture and became "slushy". I kept stirring the mixture with a pair of cooking chop sticks on low heat (left image). When the nori became a loose paste, I added soy sauce in stages as I tasted to monitor the saltiness and kept cooking until a nice paste-like consistency was reached (image below left).
I first served this as an accompaniment for sake. You just lick a small amount of this stuff on the tips of chopsticks as you sip sake. My wife thought this was a bit too salty to eat alone and suggested I use it to top boiled potatoes. I thought this was a good idea. 

I quickly microwaved  small red potatoes and added pats of butter when it was hot. As the butter was melting (above right), I topped it with my instant nori tsukudani.

To eat the dish we smashed the potatoes and mixed in the nori. This was a very good comforting dish, although this was the first time I made this and tasted it.

Thursday, December 15, 2011

Squid, asparagus, and carrot flavored with tarragon and French vermouth いか、アスパラガス、人参のタラゴン、ベルモット風味

This not a photogenic dish. In our regular market, I found some decent looking squid and got a pound of it. Early in the day, I baked ciabatta bread. So, I decided to make a squid dish which would go well with this crusty bread.
There is no recipe or dish on which this is based. From a pound of squid, I made two relatively large (for us) servings.

Squid: The squid was already cleaned. I just washed it and cut the bodies into thin (1/2 inch) rings. I cut he legs in half and made sure no cartilage or "beaks" were left. I patted the pieces dry with paper towels.

Vegetables: I used carrot (one medium, peeled and thinly sliced on the diagonal), asparagus (4, bottoms cut thinly on the diagonal and the tips cut in half lengthwise), royal trumpet mushrooms (2 large, torn length wise), shallot (one small, thinly sliced), garlic (4 cloves thinly sliced).

I started cooking with the vegetables. I added olive oil (2-3 tbs) in a large frying pan on medium heat. I sautéed the shallot, carrot, sliced stems of asparagus first. After a few minutes, I added the tips of the asparagus, royal trumpet mushrooms, and garlic and cooked for 2-3 more minutes. I seasoned it with salt, pepper, thyme (dried, 1/8 tsp) and tarragon (dried 1/4 tsp). I then added white dry vermouth (3-4 tbs) and put on a tightly fitting lid. I steam/simmered it for 1 minute and removed the lid and upped the heat to reduce the juice by about half (2-3 more minutes). I removed  the vegetables and the juice onto a plate.

I wiped the frying pan clean and added olive oil (2 tbs) on medium high heat. When the oil was shimmering on the surface, I added the squid and very quickly sautéed, seasoning with salt pepper for less than 1 minute or until the squid was just cooked. I put back the vegetables back in the pan with the juices and combined with the squid then cut the flame.

I lifted the squid and vegetable from the pan and divided in two plates leaving the juice behind in the pan. I put back the pan and further reduced the liquid (squid imparted some more juice as well). I then added a few thin pats of butter to make an instant sauce. I did not have to adjust the seasoning of the sauce. I poured it over the dish.

My wife toasted and buttered the Ciabatta bread and placed it on the side.

I am not sure how this dish should be categorized. White (French) vermouth and tarragon flavors may be considered "French" in style. Since I did not over cook the squid, it was very tender. Despite the amount of garlic I put in, it was not too garlicy and the tarragon really made this dish.

We are having the last bottle of Hall Cab 2008 with this dish. Ciabatta bread was perfect to mop up the sauce.
P.S. I am sure you can find recipes for ciabatta bread elsewhere. Few points which are important include; a sponge (starter) which I started the day before I baked the bread. Since the dough is rather sticky, I formed the ciabatta (slippers) on a parchment paper (minimal handling and forming to preserve the bubbles) and let it rise on the paper. After the second rise, I lifted the dough by grabbing both edges of the paper and placed it, still on the paper, directily on a pizza stone (baking stone, preheated).


Tuesday, December 13, 2011

Scallop carpaccio 帆立貝のカルパッチョ

Fresh sashimi-grade scallops are difficult to come by in our area. Even in sushi bars, we rarely see it. This was from Catalina offshore products with tuna sashimi and other items. It smelled (or rather did not smell at all) fresh. Since I had quite a good amount, I decided to make it into carpaccio style as you see below.
First I removed the hard muscle bundles from the scallops. To slice the scallops thinly, I placed them on the cutting board and pressed with my left index and middle finger (I'm right handed). Using a sharp and thin blade (in my case, Global's flexible Swedish filet knife), I sliced the first slice horizontally as close to the cutting board surface as possible. While keeping pressure on the scallop, I sliced the second one just above the first and so on to make about 4-6 thin slices from one scallop.

I sliced some Vidalia onion very thinly, separated the rings and scattered them on the bottom of the plate. I then sprinkled salt, black pepper and olive oil. I also splashed a small amount of Champagne vinegar. I arranged the thinly sliced scallops in one layer on the top. I garnished with small cubes of tomato (or concasse of tomato), caper, chopped chive and chopped oil cure black olives (stones removed). I sprinkled olive oil, Kosher salt, black pepper and Champagne vinegar again.

The scallop meat is very tender, fresh tasting and sweet. This will made us enjoy more cold sake! If you are not a sake drinker, dry Champaign or other effervescent wines (California sparkling wines, Cava, or Prosecco) will go well with this.

Sunday, December 11, 2011

Tuna and scallion "Negima" ねぎま

This was part of our tuna feast. Although I posted a simialr dish before, this time, I used sashimi-grade tuna. I modified how I made this scallion ("Negi") and tuna ("Ma"guro) dish.
Tuna: This was a block of tuna from Catalina. I used the red meat or "akami" portion. I did not really want to cook the tuna, so I used a kitchen torch to cook/sear the one surface and poured hot broth over it. So the center of the tuna was still raw.

Scallion: I used scallions (4 stalks) instead of Japanese negi. After I washed them, I held them over the direct gas flame (using a metal tong) until they wilted and some brown patches appeared on the white parts. I then cut them into one inch long pieces on a slant.

Broth: I made dashi using kelp/bonito dashi pack as usual. I added light colored soy sauce (Usukuchi chouyu) and mirin to season the dashi and make broth.

In a small pot which contained some hot broth, I placed the scallion and cooked for 1 minute and then mixed in two eggs and stirred until the eggs are just cooked (or became "egg flowers").

I placed the seared tuna in miniature "donabe" pots and poured the hot broth over it. I arranged the scallion and eggs as seen above.

This tasted really good and gave us a reprieve from just eating raw tuna. The texture of the tuna went very well with the texture of the egg. Compared to using non-sushi grade tuna as I did in my previous post, this is a much better way to make negima.  It's a bit of a sacrifice especially when the tuna sashimi was top-knotch quality.

Friday, December 9, 2011

Open sandwich of tuna sashimi and porched egg 鮪の漬けと温泉卵のオープンサンド

Believe it or not, we had this as a breakfast! When we visit Japan, for the first few days, we get up very early because of the time difference. Since we often stay at a hotel located in Ginza, we often walk to Tsukiji market 築 地市場 for breakfast (more precisely, to eateries in and around the Tsukiji market) which open up very early in the morning for workers in the fish market. Although we usually go for a Western style breakfast, we were amazed to see long lines of people waiting to have sushi/sashimi for breakfast at one of the popular sushi bars in Tsukiji. We (even I) thought sushi or sashimi was not a breakfast food. But we had to finish the pound of tuna sashimi block we got from Catalina. So we decided to indulge in tuna one weekend morning.
This dish is a variation of the smoked salmon and porched egg dish that we often have for breakfast.

Disk of rice: Instead of bread, I decided to make a disk of rice. I used frozen rice which I thawed by microwaving it. I just added "frikake" seasoning (bonito and wasabi flavor) and mixed. I used a ring mold and the back of the spoon to press the rice into thin disks. I then added vegetable oil with a splash of sesame oil (1 tbs) to a frying pan on medium heat. I made both sides of the rice disks slightly brown and crispy (#1).

Tuna: I sliced the red meat or akami of tuna relatively thinly and marinaded it in a mixture of sake and soy sauce (1:1) for 10 minutes and blotted off the excess marinade.

Wasabi creme fraiche: I mixed in real wasabi into creme fraiche. The amount is arbitrary but you could add quite a large amount of wasabi since the creme tends to tone down the heat. I tasted it a few times as I added more wasabi.

Poached eggs: I used pasteurized eggs and poached them as I described before. I like the egg white congealed but the yolk totally runny.

Assembly: I placed the rice disk (#1) on the plate and layered it with slices of the lightly marinaded tuna sashimi (#2), added the wasabi creme fraiche and chopped chives (#3). I then placed the poached egg on the top and further granished with Kosher salt and more chopped chives (#4).
Compared to the strong taste of our usual smoked salmon dish, this is remarkably mild. It is, nonetheless, a perfectly acceptable breakfast dish. We had cafe latte with it but if this was the evening, sake would definitely be called for.

Wednesday, December 7, 2011

Sea urchin, creamy scrambled egg on toast 雲丹とクリーミィ炒り卵のせトースト

Uni for breakfast--this may be too much of a good thing. I have to preface this by saying it was all my wife's idea. I, for one, would not have considered eating uni for breakfast. However, we were in a bind. I had ordered 4 trays of luscious golden California uni from Catalina (along with some other items) expecting to feast on them over the Friday to Sunday dinners of the weekend when my wife reminded me that one of those days we had a dinner engagement. So there we were; too much uni and not enough intervening dinners before it went bad--hence breakfast uni. We have tried the combination of soft scrambled eggs and uni before and it was really good so this was just another step along the continuum
Scrambled eggs: I made creamy scrambled eggs using a Bain Marie or a double boiler to make it extra creamy. I used pasteurized eggs (two) with the addition of cream (light cream 2 tbs), salt (1/4 tsp) and freshly cracked white pepper. After beating the eggs well, I added a thin pat of butter in the upper pan of a double boiler. When butter melted, I added the egg mixture and stirred with a silicon spatula. I kept stirring until the eggs became soft scrambled eggs (4-5 minutes). I erred on the side of slightly under cooking (this is a reason I used pasteurized eggs).

Toast: My wife had baked a loaf of white bread previously which was sliced and frozen. She toasted and then buttered it.

Assembly: I layered the creamy scramble eggs, chopped chives and then sea urchin (for two servings, I used a whole tray, 80 grams). I garnished it with strips of nori (I added more after taking picture) and a side of real wasabi. I sprinkled Kosher salt and white pepper and more chopped chives as well.
We served this with a very small bowl of kabocha and sweet potato potage (I used sweet potato instead of my usual regular potato) on the side. We smeared a little of the wasabi on the uni before eating. This is rich! You can't go wrong with this combination no matter what time of the day it is eaten. It was amazingly good as a breakfast. We had Cappuccino with this but if this had been in the evening, sake wold have been our choice of libation.

Monday, December 5, 2011

Seared or "aburi" fatty tuna トロの炙り

This is part of the tuna feast. Sometimes the fattiest part of tuna can be just a bit overwhelmingly too much fat for some (not for us). One of the ways to make the fattiness more agreeable is to use a technique called "aburi" 炙り. In the old days, charcoal fire was used but, nowadays, a kitchen torch is the most commonly used tool to accomplish this task. For this dish, I chose the fattiest portion of the tuna we had.
I placed the tuna slice on a plate and using a kitchen torch, I seared the sides of the tuna slices. I just served this with a garnish of chopped chives, fresh wasabi and soy sauce.

Searing does add a different dimension to tuna sashimi. We rather enjoyed this dish (a lot), which led to consuming more sake.

Saturday, December 3, 2011

Fatty tuna and scallion ネギトロ

Catalina offshore products did not have fresh tuna sashimi blocks for quite some time but, recently, it was back in stock. I ordered one pound along with other items. This is blue-fin tuna with "akami" and mostly "chu-toro" block which most likely came from a portion toward the tail.
The one pound block looks like you see below with the skin still attached. Top triangular part is mostly red meat or "akami" 赤身 and underneath is mostly moderately fatty or "chu-toro" 中トロ and only small amount of fatty part or "toro" トロ. We got a much better block of tuna from them in the past but given the long hiatus in availability, I am not complaining.

After I removed the skin and then the meat attached to the skin which was quite fatty (image above lower right). I decided to make "negitro" ネギトロ ("negi" means scallion and "toro" means fatty tuna) from this and other trimming or "scrap" parts. I then cut the akami by slicing horzontally (getting a triagular shaped akami block. I then divided the remaining rectangular blocks into slightly fatty ("ko-toro" and moderately fatty ("chutoro"). I wrapped each part in parchment paper, then paper towels and placed them in a Ziploc bag. I stored it in the meat drawer of the refrigerator, where it will keep up to 3 days if it is going to be used as sashimi. Any  longer and it has to be cooked.

I am not sure where "negitoro" originally came from but I believe it was popularized by low-end shushi bars such as "Kaiten sushi" 回転寿司 place serving their customers utilizing scraps or low-quality tuna sashimi either as a roll or battle ship sushi or "gunkan maki" 軍艦巻き. Certainly, I did  not have this while I lived in Japan. In any case, since I had thin but rather fatty meat (image above lower right) just off the skin, I made "negitoro".  Since the portion was not totally scrap or scrapings from the skin or bone, I cut it into small dices rather than making it almost like paste which is usually the consistency of negitoro.

I just mixed in finely chopped scallion and dressed it with a mixture of "real" wasabi (just defrosted) and soy sauce and garnished it with nori strips. This was our starter for the tuna feast evening. The only problem with this type of dish is that you tend to over indulge with sake.

Thursday, December 1, 2011

Fried lotus root sandwich 蓮根のはさみ揚げ

Lotus root or "renkon" 蓮根 is a floating stalk of the lotus plant but is not really a root. It has air channels which makes it float on the water. Japanese (and Chinese) are fond of renkon which has a nice firm texture and is rather starchy. In the past, I could occasionally get fresh renkon in the Japanese grocery store but now only ones I can get are pre-boiled in a vacuum pack. That's  just fine with me since it is always difficult to clean the insides of the air channels. The vacuum packed variety has a nice firm texture and can substitute for fresh ones for any dish which calls for renkon.
Pork: We had a whole pork loin which I made into three different kinds of roasts (Sino-Japanese pot roast, brined and non-brined pork roast cooked in the Weber with hot smoking) for Thanksgiving (we gave up on Turkey some years ago). I had some trimmings which I chopped by hand and made into ground meat. I decided to make this dish as a drinking snack. I am not sure about the amount but it was not a lot (may be less than 1/2 pound), just enough to make 7 sets of renkon sandwiches as see below.
Other ingredients for meat stuffing: I mixed in scallions (finely chopped, 3 stalks), grated ginger (1/2 tsp) and garlic (1/2 tsp), soy sauce (1/2 tsp) and mirin (1/4 tsp) and back pepper. I just kneaded the mixture together by hand until it became rather sticky. If it had too much moisture, I could add potato starch. I sliced the renkon into thin rounds (1/4 inch thick). I took a small amount of the meat mixture and made miniature hamburger patties the same size as the renkon rounds to form a sandwich (left in the image above).

Batter: I made a relatively thick tempura batter; a mixture of cake flour and potato starch (3:1) and ice cold water.

I coated the renkon sandwiches with the batter and deep fried in 340F peanut oil for 2-3 minutes turning once or until the meat was done.

I served this with green tea salt. The renkon retains a nice crunchy texture which combined with the juicy meat stuffing is very nice. This dish will go with any drink including cold beer. Other variations could use chicken or shrimp for the stuffing. Of course, you can serve more than just one per person.

Tuesday, November 29, 2011

Japanese omelet with Cod roe wrapped in nori 鱈子と海苔いりだし巻き

This is a dish I made from the cod roe left over after I made nagaimo dressed with cod roe. I posted a similar dish before but this time I wrapped the cod roe with a nori sheet before making it to a Japanese style rolled omelet. Again, I could have done a better job of centering the nori/cod roe.

The cod roe is about a half a sack mixed with sake and Tabasco. I just cut the nori sheet to the width of the square frying pan I used to make the Japanese omelet. I put the cod roe in the center of the nori sheet and rolled it to make a rather flat roll (image below left).

I just mixed two beaten eggs with dashi broth (2 tbs) and added sugar (2 tsp) and salt (a pinch). On medium heat, I put a small amount of vegetable oil (1 tsp) and poured in 1/4 of the egg mixture. When the bottom is set, I placed the cod roe/nori roll on the far side of the pan and started rolling using a spatula, Japanese cooking chop sticks and by tilting the pan to help with the rolling. I poured another 1/4 of the egg mixture into the open area of the pan, lifting the existing omelet so that the egg mixture flows under it. I rolled again and repeated the process until all the egg mixture was used resulting in a rectangular omelet (image below right).

I cut it into 6 pieces (3 for one serving). The cod roe was just barely cooked and was lovely and moist. The addition of nori makes the rolling easier as well as adding a nice oceanic flavor to this dish. The tabasco gave it a slight zing. Of course, the egg part is slightly sweet and dashi adds nice soft texture and delicate flavor. There is no need for soy sauce since cod roe gives enough saltiness. The winning combination! We, of course, had cold sake with this.

Sunday, November 27, 2011

Nagaimo dressed in cod roe 長芋の鱈子和え

This is a small dish which goes perfectly with sake. This was again made from odd bits and pieces of left overs in the refrigerator which I try to use before they go bad. In particular I was concerned about one sack of cod roe or "tarako" 鱈子 which I bought the previous weekend and had been sitting forlornly in the refrigerator ever since. I posted few dishes using cod roe.  I also found half a nagaimo 長芋 also left in the fridge and this is a quick dish I came up with. This is a sort of variation of this dish.

I first removed the roe from the sac by cutting a slit in the membrane and using the back of he knife, scraping off the roe. I added sake and Tabasco to make it a softer but not a too slushy consistency.

I peeled and sliced the nagaimo into thin disks (1/4 inch), halved, then, and cut into short match sticks. I dressed them with sushi vinegar. I drained the excess sushi vinegar from the nagaimo by lifting the nagaimo into another container. I added enough cod roe to make a nice mixture and mixed it into the magaimo (The remaining code roe was used for other dish).

I also happened to have "mitsuba" 三つ葉, a Japanese green with a distinct favor. I removed the leaves from the stem and used it as a garnish. Unfortunately, this one did not have much flavor.

This dish is a perfect small dish to start off the evening with cold sake. Tabasco added nice heat but was not too hot. The dish had an interesting texture and nice saltiness. This one has to be eaten with a spoon even if you are chopsticks jedi.

Friday, November 25, 2011

Sautéed octopus, mixed mushroom in sherry sauce 蛸ときのこのシェリー酒ソース

This is another octopus dish which could be served at an Izakaya. Since I used Fino sherry this could be considered in the Spanish style.  Again, this was made totally on a whim in the moment and there is no recipe on which this is based. Since I had leftover mixed mushroom (white and brown clam shell and Royal trumpet mushrooms), which I bought a few days ago, and green asparagus, this is the dish I came up with as a starter.
The amounts of these ingredients are all arbitrary. I had a leftover boiled octopus leg which I cut into about 12 thin slices (for two small servings). I also used green asparagus (4, After I removed and discarded the bottom parts, I cut the bottom half into thin slices on a slant and left the tips intact), garlic (two fat cloves finely minced). I removed the root ends of the clam shell mushrooms (not much whatever amount I had) and tore the royal trumpets along the length of the mushrooms in 4-5 pieces (one large)

I first sauteed the garlic and asparagus in a frying pan on medum flame with olive oil (1 tbs) for several minutes and added mushrooms. After the mushrooms were mostly cooked and soft, I added the octopus slices and sauteed for 30 seconds.  I seasoned it with salt and cracked black pepper and added Fino sherry (3 tbs, or any dry sherry). I turned up the flame and quickly reduce the liquid. I added more freshly ground black pepper after I plated the dish for good measure.

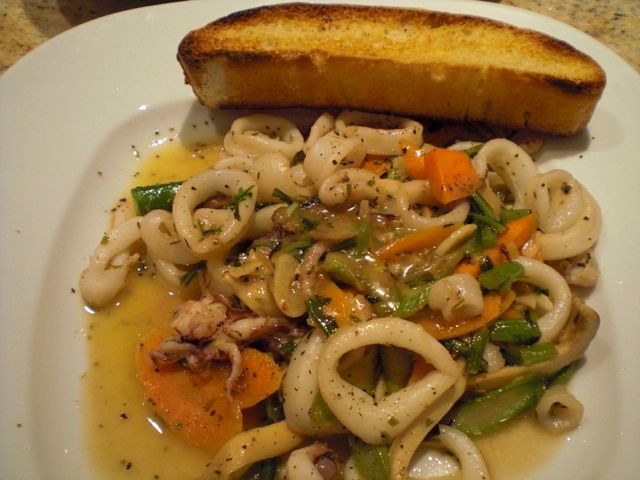
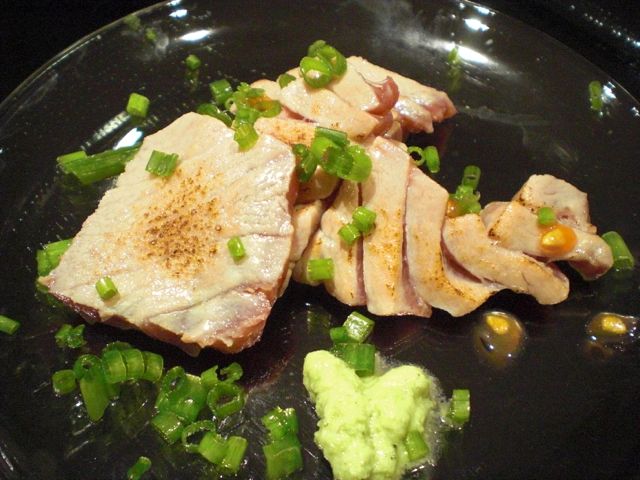
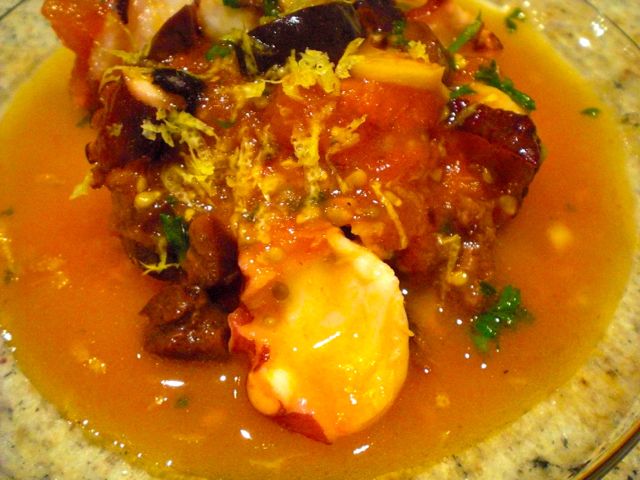
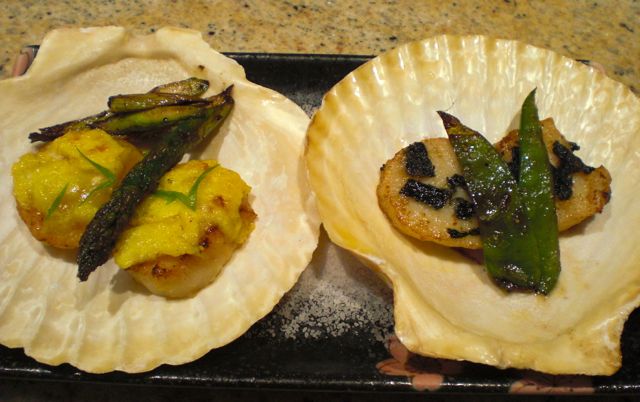
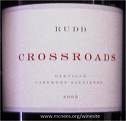
The octopus was slightly chewy but had a nice texture. Reduced sherry added a good nutty flavor, although this sherry is extremely dry you could also taste a very slight sweetness. The freshly ground black pepper gave a nice contrast. This dish will go with any drink but we had this with another classic Napa cab, Rudd "Crossroad" 2006 (75% cabernet sauvignon, 14% cabernet franc, 7% merlot, and 2% each petit verdot and malbec). This is the second label of Rudd estate. It is highly extracted with lots of upfront back fruit (black cherry, blueberry etc.) and nice vanilla and dark chocolate notes ending in firm tannin with a long finish. This dish went well with this wine. 

I may have been a bit too heavy on the black pepper since my wife somehow inhaled it (this was meant to be tasted and eaten not inhaled) but nice black pepper taste was needed in this dish.

Wednesday, November 23, 2011

Octopus with tomato and olive イタリア風 たこ、トマト、黒オリーブ煮

I bought a boiled octopus leg at the Japanese grocery store on the weekend but I did not use it. I thought I should use it for something before it goes bad. I usually make Japanese dishes from octopus but this evening, we had already opened a bottle of "Bennett family Cabernet Sauvignon 2006". This wine will not go well with "sumiso-ae" 酢みそ和え. So, I concocted this dish; sort of Italian in style but I did not follow any recipe or I did not have any dish in mind to base this one on.

Octopus: The tentacle was medium in size, just boiled but not previously vinegared. I just sliced it rather thinly. To prevent it from getting too tough during cooking, I made shallow scores on one side.

I decided on making a quick tomato sauce "on the fly". So I skinned Campari tomatoes (4) and cut them into large chunks. I crushed and minced garlic (2 fat cloves). I removed the stone from black olives (6 or so, I am not sure what kind).

In a small skillet, I added olive oil (3 tbs) on low flame and added the garlic, red pepper flakes and slowly cooked it until the garlic became fragrant and very slightly brown. I added the tomatoes, chopped black olive, salt, and pepper. I turned up the heat to medium and cooked for 2-3 minutes (This is not really a tomato sauce). I then added slices of octopus and cooked for 30 more seconds or just until warm--not really cooking it further. I cut the heat and tasted it. I adjusted the seasoning by adding salt and a pinch of sugar since I thought it was a bit on the acidic side. I was thinking of adding lemon juice but changed my mind and only added grated lemon zest (using a micrograter) to give it a lemony flavor. I garnished  with chopped parsley (If I had fresh thyme, I may have used thyme). My wife quickly toasted some bread (store bought semolina bread) for mopping up the juice. 

For an instant improvised dish, this was not bad at all. The octopus slices were tender and not chewy. The red pepper flakes gave a pleasant buzz in your mouth. Even some acidity did not complete with the red wine we were having. This cab from the Bennett family winery is a middle of the road Napa cab, not over-the-top and not too austere. 

Monday, November 21, 2011

Green beans with black sesame sauce インゲンのねり黒ごま和え

This is another small dish I made one evening as a drinking snack. I usually use white sesame paste or "shiro-nerigoma" 白練り胡麻 to make sauce for green beans but I found that I was out of white sesame paste (it can be bought in a Japanese grocery sore and comes in a small can, glass jar, or plastic pouch) but I had black sesame paste "Kuro-nerigoma" 黒練り胡麻.

Not many food items are completely black; black sesame, nori sea weed, and squid ink are three I can think of. Some Japanese food products do contain charcoal powder and black, touting some health benefits, but I do not consider pure carbon powder food.

In any case, I trimmed and boiled green beans for 5 minutes or so until cooked but still crunchy. I immediately shocked them in ice water to make the color bright and to stop the cooking.

Dressing: I put the black sesame paste (3 tbs) in a small Japanese mortar or "suribachi" すり鉢 and added sugar (1 tsp), soy sauce (1 tsp) and mirin (2 tsp). Using a pestle "surikogi" 擂り粉木, I mixed it until a nice saucy consistency is reached.

I garnished it with roasted white sesame seeds. The taste is similar to white sesame paste but the visual effect is quite different. I served this with slices of miso-marinated tofu. This dish really depends on the quality of the green beans. Some green beans have tough skins and no matter how long you cook them, the skin remains tough and fibrous. This time, we were lucky. These beans were still crunchy but not fibrous at all and the black sesame dressing looked nice with great contrast to the red of tomato and white of tofu.

Saturday, November 19, 2011

Baked pork tenderloin salad オーブン焼き豚ヒレ肉のサラダ

Am I having too many padding posts?  I usually have two cooked meats readily available in our refrigerator--oven roasted pork tenderloin and microwaved chicken breast. This time it was the left-over pork that I used. I made this pork tenderloin several days ago using a dry rub I recently came up with (a mixture of ground smoked paprika, cumin, clove, cinnamon, black pepper and salt). Without searing the surface of the pork I put it in a 350F oven for 30 minutes or until temperature of the thickest part registers 145F.  The pork came out very tender and flavorful and it is surprisingly easy to make.

Using this tender and moist pork, I made this quick salad as a starter. I used all the usual suspects; small cubes of cooked pork tenderloin, snake-belly cut American mimicucumber, skined and quartered Campari tomato, finely chopped scallion and baby arugula. The cucumber was first dressed in sushi vinegar and then the excess liquid was squeezed out before comabining with the rest.

The dressing is simple store bought (real) mayonnaise, Dijon mustard, soy sauce and Japanese 7 favored red pepper powder 7味唐辛子. For good measure, I sprinkled 7 flavored pepper on the top.

We had this with a highly extracted Napa Cab loaded with fruits and full body, Hall Cabernet Sauvignon 2008. RP gave 95. With this price point, this is a good buy.

Thursday, November 17, 2011

Otokomae tofu 男前豆腐

The kind of Japanese dishes I can make in the U.S. is really driven by what ingredients are available.  I may have lamented the fact that the tofu we could get here was not really good especially the kind found in the supermarket. One of the Kyoto tofu makers called "Kyozen-an" 京禅庵 built a factory in New Jersey some years ago and their tofu was pretty good but after the incidence of salmonella contamination in their bean sprout products and failing FDA inspection, their tofu is no longer available in our near-by Japanese grocery store. Last weekend, when I was there, however, I found another Kyoto tofu called "Otokomae tofu" 男前豆腐. Sometime ago, I read about this tofu maker in Kyoto foodie. 

So, without hesitation, I bought one. It came in a very un-traditional shaped container (shaped like a surf board) and the printing on the front said something like "Blowing in the wind tofu maker, Johnny". "Johnny" is supposedly the nick name of the president of the company, Shingo Ito. I also noticed that the bar code on the lower right is shaped like a wave (tune 90 degree anti-clock wise) with a surfer on it (You will find a close up image at Kyoto foodie). It also states that it contains Hokkaido daizu 大豆 soy bean and natural coagulant (nigari にがり) from Okinawan sea water.

In any case, I figured that this could not be bad. I also thought that  this type of tofu was best eaten as is. I scooped up the tofu into glass bowls. Instead of my usual condiments for cold tofu, I decided to go with the simplest way to really enjoy the flavor of tofu.

As you can see below image, I served this tofu with green tea salt-obviously, the green one on the right and "Yukari" ゆかり salt - red one on the left - which is dried red perilla and salt, by-products of making picked plum or "umeboshi" 梅干し.

Most Westerners think tofu does not have any taste. Actually many supermarket varieties even have some unpleasent smell and taste. This tofu has a real nice flavor of soy beans and unctious creamy texture. We just sprinkled either green or red salt and really enjoyed this tofu. Hope I can get this next time I go to this Japanese grocery store (the only such store left in the neighbourhood).

Tuesday, November 15, 2011

Sautéed scallops two ways; with nori and egg yolk 帆立貝の黄金焼き、海苔焼き

Hokkaido is famous for scallops among other sea food and I am partial to it but, come to think of it, I have not cooked scallops that often. So, I decided to make this dish one weekend.

I thought I would make a standard scallop dish called a "Golden grilled" scallop. This dish uses only an egg yolk which leaves the egg white behind. So I also made "nori coated scallop" or "Seashore grill" 磯辺焼き using the egg white.

I got medium sized "dry" sea scallops. In an ideal situation, you would like to get fresh ones with roes (liver) and membrane ("himo" 紐 in Japanese) attached but the ones I got were just the muscle. I removed the hard small bundle of muscle from the main muscle. I washed and patted dry. I salted the scallops but did not use any marinade this time.

I separated a pasteurized egg into the yolk and white. I mixed a small amount of mirin (less than 1 tsp) and salt into the egg yolk.

I tore the nori into small pieces. I dipped half of the scallops into the egg white and then rolled them in the nori to coat. The remaining scallops and the nori coated scallops were then sautéed in melted butter on medium high heat until both side were nicely brown turing once for 1 minutes or so depending on the thickness of the scallops. (Do not over cook). I took out the ones I was using for golden scallops before they were completely cooked. I left the nori coated ones for another 30 seconds to complete cooking.

For the golden scallops, I placed the sautéed scallops on a metal tray in a toaster oven on grill mode. I brushed the egg yolk mixture over the grilling scallops several times until a golden crust formed (2-3 additional minutes).

In the same sauté pan I used to cook the scallops, I added green asparagus (skin peeled and the bottom portion cut into several pieces on a slant) and snow peas. I cooked them for a few minutes in the remaining melted and browned butter seasoned with salt and pepper.

I placed scallop shells on the plate covered with a layer of Kosher salt to make the shells stable. I garnished the golden scallops with the green part of a scallion cut in a decorative shape and served with a side of asparagus. For the nori-coated scallops, I added a garnish of snow peas.

This is a perfect drinking snack. Both recipes have some variations. For golden scallops, you could add miso and sugar to the egg yolk. For Isobe scallops, you could marinade the scallops in a mixture of mirin and soy sauce before grilling or sautéing and instead of small pieces of nori, you could use a larger rectangle of nori to wrap the cooked scallops.

Sunday, November 13, 2011

Sake steamed chicken and avocado 酒蒸し鶏肉とアボカドのピリ辛和え

This is another padding post but is a quick and nice drinking snack in the true spirit of Izakaya food as long as you have a cooked chicken and ripe avocado. As I mentioned in another post, roast pork tenderloin and microwaved sake steamed chicken are regulars in our refrigerator.

The idea for this dish came from tuna and avocado cubes.  I just sliced the cooked chicken breast with skin attached and quartered the avocado slicing it into pieces on the slant. 

For sauce, I mixed grated garlic (1 small clove), garlic chile paste (1/4 tsp), sesame oil (1/2 tsp), ponzu shouyu (1 tsp) and semi congealed liquid from the container where the chicken breast was kept (1 tbs).

I am really fond of microwave sake steamed chicken breast. It is so easy to make and is a nice thing to have in the refrigerator which can be used many different ways. The sauce really makes this dish come alive. The spiciness combined with the tender texture of the chicken juxtaposed to the texture and taste of the avocado makes this dish much more than the sum of its parts.

This dish will go well with any drink but we were having cold sake with this.

Friday, November 11, 2011

Nagaimo pancake トロロ焼き

Since we do not have easy access to an Izakaya, I check Izakaya blogs to get vicarious enjoyment out of their reports. I saw this dish called "tororo-yaki" in one such Izakaya blog that the author found when drinking in an "Okonomiyaki" place. ("Tororo" is the name for grated yamaimo or nagaimo). Japanese pancake or "okonomiyaki" お好み焼き is not one of our favorites. For us, it tends to be too heavy and with so many ingredients all mixed together the taste is muddy--like the color you get when you mix all the colors in the paint box together. But, this one looked very interesting and I decided to try it. While the aforementioned blog, described the dish and included pictures of the final product including each step showing how to cook it, the blog did not include the recipe per se. So if I wanted to taste the dish I just had to come up with the recipe--as I imagined it must have been made.


The first pictures above shows the final product. I topped it with cheese (picture directly above) and added dried bonito shavings or "katsuobushi" 鰹節 (top picture). I served it cut into 4 pieces using a pizza cutter and with a little of soy sauce.

I surmised the original recipe may have used "mountain yam" 山芋 but I only had the domesticated version called "Nagaimo" 長芋. Since nagaimo is not as sticky as yamaimo and a bit more watery, I decided to mix in an egg.

I grated the nagaimo (about 1 cup) and mixed in soy sauce (1 tsp) (#1). I then added one beaten egg and poured it in a non-stick frying pan with a small amount of vegetable oil (1 tbs) on a medium flame (#2). When the bottom was set, I spread finely chopped scallion on top (3 stalks) (#3). Using a spatula, I started folding the edges toward the center all around (#4). After several minutes, I flipped the pancake until both sides were brown (#5). I placed three slices of smoked aged cheddar cheese on top (my wife's choice) and put the lid on for another 1-2 minutes until the cheese melted (#6).

I placed the pancake on the bed of baby arugula and spread shaved bonito flakes with a bit of soy sauce.

This is a very interesting dish--in a good way. The center was still soft and the scallion flavor was well integrated. It had the mouth feel of the most tender-delicate french omelet you've ever tasted and yet it was very clearly not an omelet.  My wife's choice of smoked cheddar added depth of flavor and almost a sense of barbecue that went surprisingly well with the bonito. We really liked this dish and cold sake was the perfect choice.

Wednesday, November 9, 2011

Microwave sake steamed chicken with black vinegar gelée and myouga マイクロウェイブ酒蒸し鶏胸肉とミョウガの黒酢ジェレー

This is another nothing quick dish but a perfect Izakaya food. Recently, I have been making sake steamed chicken breast by microwaving chicken in a silicon steamer for microwave. I usually do not cook anything in the microwave (just re-heat), so this is new development for me. But if precisely timed and allowed to rest for 10 minutes or longer, the chicken comes out perfectly and cleaning up is much simpler.

Here is how I do it. I usually get bone-in and skin-on split chicken breasts. I remove the bones (do not leave the wish bone behind) and tenderloins (use for another dish). I remove any excess skin and fat but I keep the skin. Keeping the skin makes the chicken moist during the microwaving. If you like the skin, you could leave the skin or remove the skin after cooking. After removing excess fat from the cooked skin, I cut it in thin strips and use it in salad etc but this is totally up to you.

In any case, I placed two half breasts in a silicon microwave steamer after somewhat liberally salting both sides.  I then added slices of ginger root, and scallion (two stalks lightly bruised). I poured sake (3-4 tbs) (image below left) and put on the lid (image below right) and microwaved it for 5 minutes and 30 seconds (Mine is 600W, please adjust the time depending on the power of your microwave).

I let it steam in the container with the lid on after I remove it from the microwave. Some times, as it cools, the silicon container may buckle since the lid is rather tight. I place the container on a plate to prevent possible spillage (Spillage has not happened to me so far). When the chicken cools down enough so that you can handle it safely (10-15 minutes), you can use it in whatever dish you like.

This time, I had fresh myouga 茗荷. So I halved and thinly sliced the myouga. I also made jabara cucumber. I sliced the chicken after removing the skin. I scraped off any excess fat from the back of the skin and cut it in thin strips. I put the strips of skin on the top of the chicken slices resting on a base of baby arugula. I sprinkled yuzu-souyu sauce (from the bottle) and garnished with small chuncks of black vinegar/soy sauce gelee (top image).

I think the chicken turned out better than the conventional way of sake steaming. Few important tips include finding out the exact timing, getting equal sized half breasts which will snuggly fit in the silicon steamer, and letting it steep in the container with the lid on until cool. Before I got the timing right, I undercooked and overcooked it few times. Now this is so easy and quick to make. Once I made the chicken this way, I keep it in a sealed container in the refrigerator and make small Izakaya dishes and sandwiches. The liquid left in the container is also very flavorful and lightly congeals in the fridge. You coudl just coat the slices of chicken with it or add it to you sauce, which adds wonderful mouth feel and flavor.